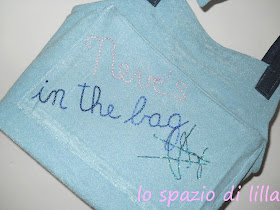
Con Neve ho imparato un'altra cosa: quando si va per negozi o per uffici, la cosa migliore è tenere la piccola in borsa, per la tranquillità sua e mia.
Nei negozi specializzati ne ho viste molte, ma vi pare che io vada a comprare una borsa?
Allora, se avete bisogno anche voi di una borsina per il vostro cucciolo, trovate una vecchia felpa e iniziamo la trasformazione!
Do you need a bag carrier for your puppy?
If you like, you can sew it upcycling an old sweater, just like I did!
Io ho utilizzato una felpa effetto ciniglia appartenuta a Cucki, misura 11/12 anni...
I used my son's old sweater...
Ho tagliato le maniche e la parte superiore...
I cut the sleeves and the part of the cowl...
Ho scavato ancora un po' gli scalfi manica, ho piegato i bordi e li ho trapuntati usando il filo in nylon invisibile (così sono invisibili anche le mie imperfezioni di cucito!!!)...
I cut a little bit more the harmhole sleeves, folded the borders and sewn them using a transparent thread...
Ho riutilizzato la tasca che aveva già la felpa, scucendola e riposizionandola con l'aggiunta di una cerniera: se nella borsa c'è il cucciolo, nella tascona ci saranno tutte le nostre cose...
I made a change to the existant pocket of the sweater adding a zip. The outside pocket is important to put everything we need...
Ho piegato i lati superiori formando un alto bordo e li ho trapuntati tutt'intorno...
I folded the upper sides and sewn them all around...
Ho aggiunto i manici, riciclati da un vecchio zaino...
I added the straps, upcycled from an old backpack...
Infine ho cucito il fondo, creando gli angoli e bloccando gli stessi all'interno della borsa in modo da rendere il fondo un po' più pesante.
Come avrete notato, non ho foderato la borsa in quanto il tessuto è già abbastanza consistente e poi, quando la laveremo, asciugherà più in fretta...
I sewn the bottom of the bag, making the angles in both sides. As you noticed, I didn't add the lining, so tha bag will dry faster when washed...
Per fare in modo che Neve potesse "sedersi" comodamente, ho creato una base rigida utilizzando dei cartoncini ricoperti in plastica: ne avevo due e per raggiungere la lunghezza necessaria al fondo della borsa li ho accoppiati sfalzandoli, fermandoli poi con una buona dose di nastro adesivo per pacchi.
Per ricoprire il fondo removibile ho usato il tessuto delle maniche...
To make the bottom of the bag stronger and comfortable for Neve, I used a piece of plastic of the right size to fill in, and covered it using the sweater sleeves.
Of course, this part is removable.
Ho infilato il fondo rigido nella borsa ed il lavoro è terminato...
Anzi, no...
Per concludere ho aggiunto un piccolo borsellino per il cellulare e poi mi sono divertita a "scarabocchiare" qualcosa sulla tasca davanti, ripensando agli adesivi del tipo "bimbo a bordo"!
I put the plastic bottom into the bag and the job was done!
Indeed, no...
I also added a little purse for my cell and stitched the name of my puppy, Neve, on the front of the pocket!


hai sempre delle idee strepitose!peccato che non ho un cucciolo da portare e spasso...
RispondiEliminaBrava!
Una idea tanto semplice quanto grande e ben raccontata. La pinno!
RispondiEliminaIl tutorial migliore che ho trovato nel web! (:
RispondiElimina